Here’s a number that might make you wince: the average iPhone screen repair at an Apple Store costs between $199 and $379, and even more for newer Pro Max models. That’s a big expense for a cracked screen. The good news is, with iPhone repair at home, you can fix many issues yourself for a fraction of the cost using the right tools and a bit of patience.
DIY phone repair has grown rapidly in recent years. With Right to Repair laws expanding and Apple’s Self Service Repair program improving through 2025 and 2026, users now have better access to parts and guides than ever before. Whether you’re comparing DIY vs. professional iPhone repair or ready to fix your device yourself, having the right tools is key.
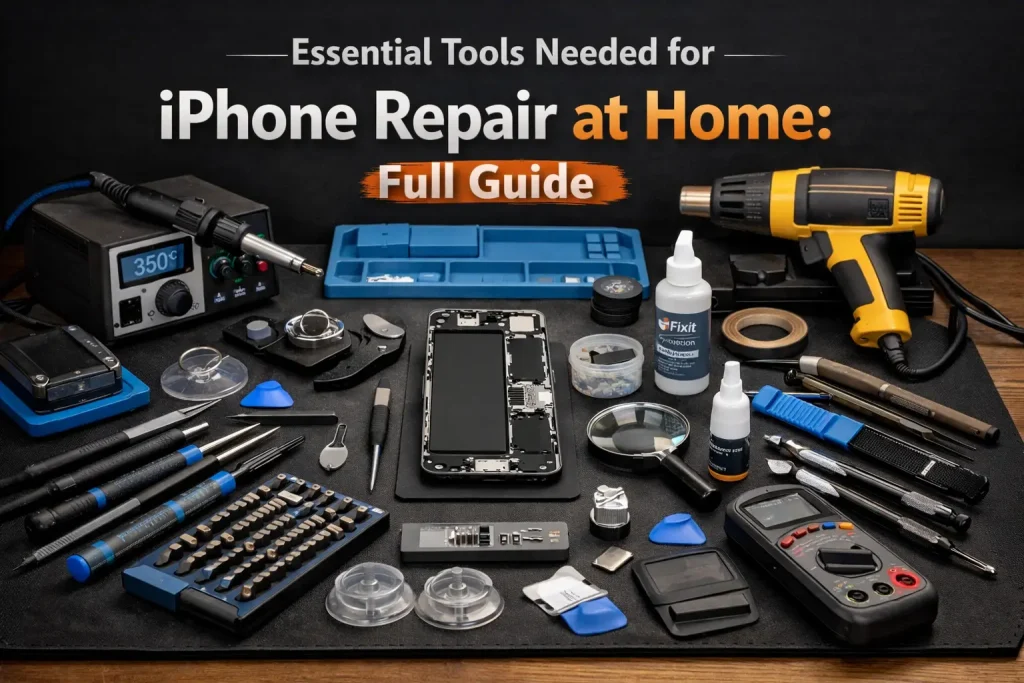
In this guide, we’ll cover the essential tools you need for iPhone repair at home, from basic screwdrivers to advanced equipment, so you know exactly what to buy and how to get started.
Why DIY iPhone Repair at Home Is Worth It in 2026
Professional iPhone repairs are expensive; battery replacements alone can cost $89 to $119, plus time and inconvenience. With iPhone repair at home, you can fix common issues for much less.
A DIY toolkit costs around $25 to $70, and parts like batteries are often $15 to $25. You can recover your costs after just one repair and save even more over time.
Thanks to Right to Repair laws and Apple’s Self Service Repair program, access to genuine parts and guides is easier than ever. Plus, repairing your phone helps reduce e-waste and extend your device’s life.
DIY repair is also rewarding and builds confidence. However, for complex issues like water damage or logic board problems, professional help is still the better choice. If you’ve ever wondered whether it’s actually cheaper to repair or replace your phone, the math usually favors repair, especially when you’re doing it yourself.
Precision Screwdriver Sets — The Foundation of Every iPhone Repair Kit
If there’s one tool category you absolutely cannot skip, it’s a quality precision screwdriver set. This is the backbone of your entire repair toolkit, the thing you’ll reach for before anything else every single time you crack open an iPhone.
Here’s the thing most people don’t realize until they’re staring at the bottom of their iPhone: Apple doesn’t use standard Phillips head screws on the exterior. Those two tiny screws flanking the Lightning or USB-C port? They’re Pentalobe screws, a proprietary five-point design that Apple specifically uses to discourage casual disassembly. Without a P2 Pentalobe driver, you literally cannot open an iPhone. Full stop.
But the Pentalobe is just the beginning. Once you’re inside, you’ll encounter a mix of Phillips #000 screws (the tiny ones securing brackets and shields), Y000 Tri-point screws (used on iPhone 7 and later models for internal components), and occasionally standoff screws that require a specialized hollow bit. A good precision set covers all of these.
What to Look For in a Precision Screwdriver Set
For your iPhone Repair at Home, here what you should look for a precision screwdriver set:
- Pentalobe P2: Essential. This is your entry point for every iPhone repair.
- Phillips #000: The workhorse for internal bracket screws.
- Y000 Tri-point: Required for iPhone 7 and newer models.
- Standoff bit: Needed for select internal screws, especially around battery connectors.
- Magnetic tips: Hugely helpful for handling screws that are literally the size of a grain of sand. Non-magnetic tips exist for situations where magnetism could interfere with components, but for most home repairs, magnetic is the way to go.
Top Recommended Sets
- The iFixit Mako Driver Kit is the gold standard in the repair community. It includes 64 precision bits covering virtually every screw type you’ll encounter in iPhones, MacBooks, game consoles, and more. The build quality is excellent, the bits are S2 steel, and the driver handle has a smooth-spinning top cap that makes fine work much easier.
- If you’re on a tighter budget, the Kaisi 136-in-1 and XOOL 80-in-1 sets offer solid quality at a lower price point. They won’t last as long as the iFixit under heavy use, but for occasional home repairs, they’re more than adequate.
Pro tip: Never, ever force a screwdriver into a screw head. If it’s not fitting snugly, you’ve got the wrong bit. Stripping a Pentalobe screw on your iPhone is a nightmare scenario that can turn a 30-minute repair into a multi-hour ordeal. Take the extra two seconds to confirm the bit size before applying pressure.
Prying and Opening Tools — Spudgers, Suction Cups, and Picks
Once you’ve removed those bottom Pentalobe screws, you need to actually separate the screen from the body. This is where prying and opening tools come in; using the right ones makes all the difference in your iPhone repair at home between a clean separation and a scratched, damaged result.
Suction Cups
A suction cup is your first tool after the screwdrivers. You press it onto the screen, pull gently but firmly, and create just enough of a gap to slide in a pry tool. Single suction handles work fine for most people, but dual-handle suction cups (and the popular iSclack device) offer more controlled, even force that reduces the risk of cracking a screen during opening.
If you’re planning to tackle a screen replacement, having the right suction cup technique is critical. You can find more specific guidance in our DIY phone glass repair tips and tricks article.
Spudgers
Spudgers are the unsung heroes of phone repair. These stick-like tools come in two main varieties: nylon (plastic) and metal. For iPhone work, nylon spudgers should be your default choice. They’re firm enough to disconnect ribbon cables and pry up connectors without conducting electricity or scratching delicate components.
Metal spudgers have their place; they’re useful for scraping old adhesive or prying up stubborn battery pull tabs, but use them with extreme caution near flex cables, logic boards, and LCD connectors. One slip with a metal spudger can sever a cable that costs $50+ to replace.
Plastic Opening Picks
Think of these as guitar picks for your phone. After creating an initial gap with the suction cup, you slide these thin plastic picks around the perimeter of the screen to cut through the adhesive holding it in place. Having at least four or five on hand is smart; you’ll want to leave some wedged in place to prevent the adhesive from resealing while you work your way around the phone.
The triangular picks from iFixit are particularly popular because they’re thin enough to slide in easily but rigid enough to actually cut adhesive. Avoid using metal tools like razor blades for this job. Just don’t.
Heat Application Tools — Loosening Adhesive Like a Pro
If you’ve ever tried to pry open a modern iPhone without applying heat first, you know the struggle. Apple uses industrial-strength adhesive throughout their devices — around the screen, under the battery, and along various internal brackets. Trying to separate these components cold is a recipe for cracked screens and torn cables.
Your Heat Application Options
- iOpener Heating Pad: This is the safest and most beginner-friendly option. It’s a gel-filled pad you heat in the microwave for 30 seconds, then lay across the edge of your iPhone to soften the adhesive. No temperature controls to worry about, no risk of overheating. If you’re just getting started with repairs, this is what I’d recommend.
- Heat Gun: A dedicated heat gun gives you more precise temperature control and works faster than a heating pad. Most iPhone repairs call for temperatures between 80°C and 100°C (176°F–212°F) at the surface. The key is to keep the heat gun moving — holding it in one spot for too long can damage the OLED display underneath.
- Hair Dryer: In a pinch, a regular hair dryer on its highest setting can work, but it’s far less precise. It takes longer, the heat distribution is uneven, and you have less control. It’s a last resort, not a primary tool.
Regardless of which method you choose, I’d strongly recommend picking up an infrared thermometer (around $15–20 on Amazon). Point it at the phone’s surface to monitor the exact temperature. This eliminates the guesswork and prevents you from overcooking your display. Also, always work on a heat-resistant silicone mat to protect your work surface.
Tweezers, ESD-Safe Tools, and Anti-Static Equipment
Once you’re inside the phone working with tiny screws, delicate ribbon cables, and microscopic connectors, a good pair of tweezers becomes indispensable. But not just any tweezers — you need the right kind for the right job.
Precision Tweezers
- Straight-tip tweezers: Best for picking up screws and placing small components.
- Curved-tip tweezers: Ideal for reaching around obstacles and lifting flex cables at an angle.
- Angled/fine-point tweezers: Perfect for positioning tiny components in tight spaces, like the microphone mesh or SIM tray springs.
Invest in at least one curved-tip and one straight-tip pair. Stainless steel with an anti-magnetic finish is ideal.
ESD Protection: Don’t Skip This
ESD stands for Electrostatic Discharge, and it’s the invisible threat that can destroy your iPhone’s logic board without you even realizing what happened. You know that little static shock you get when you touch a doorknob in winter? That same type of discharge, even at levels too small for you to feel, can fry sensitive integrated circuits on the logic board.
At minimum, you should be working with an ESD-safe wrist strap connected to a grounded surface. These cost less than $10 and provide a constant path for static to dissipate safely. For a more comprehensive setup, add an anti-static mat to your workspace. Many repair mats (like the popular blue silicone mats you’ll see everywhere) combine heat resistance with ESD protection in one product.
For working around particularly sensitive components, consider ESD-safe plastic tweezers. They won’t conduct electricity and eliminate the risk of accidental shorts when probing near the logic board.
Magnification and Lighting — Seeing the Tiny Details
I’ll be honest: I underestimated the importance of good magnification when I started doing repairs. I figured my eyesight was fine. Then I spent 20 minutes trying to identify which of two nearly identical connectors I’d failed to seat properly, squinting under a desk lamp, and I immediately ordered a magnifying setup.
iPhone components are tiny. We’re talking about screws that are 1.2mm long, ribbon cables thinner than a piece of paper, and solder joints you can barely see with the naked eye. Even if your vision is 20/20, magnification makes everything easier and reduces the chance of mistakes.
Magnification Options
- USB Digital Microscope ($25–$60): Plugs into your laptop and displays a magnified live feed on your screen. Excellent for inspecting solder joints, identifying damaged components, and documenting your work. This is my personal recommendation for most home repairers.
- Headband Magnifier ($10–$30): Wearable magnification with multiple lens options. Keeps your hands free and is great for extended repair sessions.
- Desk-Mounted Magnifying Lamp ($30–$80): Combines a large magnifying lens with a built-in LED ring light. Perfect for a dedicated repair workstation.
Lighting
Good lighting isn’t optional, it’s essential. A bright, white LED work light positioned at a low angle helps you see inside the phone without creating harsh shadows. Ring lights and flexible gooseneck LED lamps are popular choices. Avoid working under warm, yellowish incandescent lighting, which makes it harder to distinguish between similar-colored components and connectors.
Adhesive, Sealants, and Replacement Parts Essentials
Tools get you into the phone, but adhesive, sealants, and quality replacement parts are what ensure a clean, long-lasting repair. Cutting corners here can mean a screen that pops off, a battery that shifts around, or a phone that’s lost its water resistance. Not worth it.
Screen Adhesive
You’ve got two main options for reattaching screens: pre-cut adhesive strips and liquid adhesive (B-7000 or T-7000). Pre-cut strips are model-specific, shaped to match your exact iPhone frame, and are by far the cleaner and easier option. Liquid adhesive is messier and takes longer to cure, but it’s useful for situations where pre-cut strips aren’t available or you need to bond non-standard components.
For most standard screen replacements, go with pre-cut strips. They’re what’s used in professional repair shops, and you can find them for virtually any iPhone model. If you’re looking at a complete iPhone screen repair kit, many include the adhesive strips already.
Waterproof Sealing
Modern iPhones (iPhone 7 and later) come with an IP67 or IP68 water resistance rating. When you open the phone for a repair, you’re breaking that seal. Waterproof sealing tape can help restore some level of water resistance after your repair, though it’s important to understand that no DIY seal will be as robust as the factory original.
Where to Source Quality Replacement Parts
Part quality matters enormously. A cheap $8 screen from an unknown seller might save you money upfront, but it’ll often have poor color accuracy, reduced touch sensitivity, and a lifespan measured in months rather than years. The actual iPhone screen repair cost of a quality replacement is higher, but the long-term value is significantly better.
Here are the most reputable parts suppliers in the repair community:
- iFixit: Premium pricing but excellent quality control, detailed compatibility guides, and generous warranty policies.
- MobileSentrix: A go-to supplier for many professional repair shops. Wide selection, competitive pricing, and a reliable grading system for screen quality tiers.
- Injured Gadgets: Good mid-range option with frequent sales and solid quality.
Avoid no-name parts from random marketplace sellers. The money you save isn’t worth the frustration of a defective component that fails two weeks after installation.
Essential Consumables to Keep on Hand
- Battery adhesive pull tabs (buy spares — these are one-time-use and break often)
- Isopropyl alcohol (90% or higher) for cleaning connectors and removing adhesive residue
- Microfiber cloths for wiping screens and lenses
- Kapton tape for insulating and securing flex cables during reassembly
- Compressed air for blowing dust out of ports and speaker grilles
Soldering Equipment for Advanced iPhone Repairs
Let me be upfront: most common iPhone repairs, screen replacements, battery swaps, charging port replacements on modular models, don’t require any soldering at all. These are plug-and-play component swaps that anyone can learn.
But if you want to go deeper, charging port replacements on older models where the port is soldered to the logic board, microphone or speaker repairs, or any kind of board-level fix, you’ll need soldering equipment. This is where iPhone repair transitions from “adventurous hobbyist” to “serious repair technician” territory.
Soldering Stations
For micro-soldering work on iPhones, you need a temperature-controlled soldering station, not a cheap plug-in iron from the hardware store. Precise temperature control is critical when you’re working on components that are millimeters apart on a densely packed logic board.
Recommended stations for home use include:
- Hakko FX-888D ($100–$120): The industry standard for entry-level professional work. Reliable, precise, and built to last decades.
- KSGER T12 ($40–$60): A popular budget alternative with T12 tips that heat up incredibly fast. Great value for hobbyists.
- Pinecil ($25–$35): A portable, USB-C powered iron that’s surprisingly capable for its size and price.
Hot Air Rework Stations
A hot air rework station is used for removing and reflowing surface-mount components — think chip replacements, reflowing solder joints, and removing shielding cans from the logic board. The Quick 861DW and Hakko FR-810B are popular choices among repair technicians.
If you’re just starting out with soldering, I’d strongly recommend practicing on a dedicated practice board before touching your iPhone. You can buy practice PCBs with various component types for under $10. This lets you build muscle memory and confidence without risking an expensive device.
Soldering Consumables
- Flux: Essential. Flux cleans oxidation from solder joints, helps solder flow properly, and is the single biggest factor in clean, reliable joints. Use a good-quality rosin flux paste.
- Solder wire: Leaded solder (63/37) is easier to work with than lead-free for beginners. Use thin gauge (0.3mm–0.5mm) for iPhone-sized work.
- Solder paste: Used with hot air for surface mount work. Comes in syringes for precise application.
- Solder wick/braid: For removing excess solder and cleaning up joints.
- Tip cleaner (brass wool): Keeps your iron tip clean and tinned for optimal heat transfer.
Organization and Workspace Setup for iPhone Repair
I cannot overstate how important workspace organization is for iPhone repair at home. iPhones contain dozens of tiny screws, many of which look nearly identical but are different lengths. Put a 2.2mm screw where a 1.6mm screw belongs, and you could puncture through to the display and create a bright spot (called a “long screw damage”) that’s essentially irreversible.
Magnetic Project Mats
A magnetic project mat is, in my opinion, the single most underrated tool in iPhone repair. These mats have a magnetic surface that holds tiny screws exactly where you place them. Many include a grid or whiteboard surface where you can draw your phone’s layout and place each screw in its corresponding position as you remove it.
The iFixit Magnetic Project Mat is the most popular option, but there are plenty of alternatives on Amazon for $10–15 that work just as well.
Screw Organizers and Labeling
- Compartmented plastic trays (like bead organizers) work great for sorting screws by repair step
- Painters tape strips on your workbench — stick screws to labeled pieces of tape as you remove them
- Some experienced repairers use a printed iPhone screw guide and place each screw directly on the diagram
- Magnetic parts trays keep components from rolling away during multi-step repairs
Setting Up Your Repair Space
You don’t need a dedicated room for iPhone repair, but you do need a clean, well-lit, organized area. A sturdy desk or table in a low-traffic room works perfectly. Make sure the surface is clear of clutter, and lay down your silicone mat or anti-static mat as a base. Good overhead lighting plus a task light or magnifying lamp gives you the visibility you need.
Keep your phone elevated at a comfortable working height to reduce neck and back strain. Some repairers use a small phone holding clamp or stand to keep the device stable while they work. A stool or chair that puts your elbows at desk height helps prevent fatigue during longer repairs.
Must-Have iPhone Repair Toolkit Bundles and Kits (2026 Picks)
If you don’t want to buy each tool individually, a pre-made repair kit can save you time and often money. Here’s how the best options stack up in 2026.
Best All-in-One Kits
- iFixit Pro Tech Toolkit ($70–$80): This is the kit I recommend to anyone who’s serious about repair. It includes 64 precision bits, multiple spudgers, opening picks, suction cups, tweezers, an anti-static wrist strap, and an organizing case. The quality is excellent across the board, and iFixit stands behind their tools with a lifetime warranty.
- Kaisi 38-in-1 Professional Kit ($20–$30): A solid budget option that covers the basics for iPhone repair. You’ll get Pentalobe, Phillips, and Tri-point drivers, plus suction cups, spudgers, and pry tools. The bit quality isn’t quite at iFixit levels, but it’s perfectly adequate for occasional repairs.
- XOOL 80-in-1 Precision Set ($15–$25): The best value pick. Loads of bits and accessories at a very low price. Some of the bits may wear faster under heavy use, but for a home repairer doing a handful of fixes per year, this kit delivers impressive bang for the buck.
What’s Usually Missing from Pre-Made Kits
Even the best kits have gaps. Here’s what you’ll typically need to add:
- A heat source (iOpener, heat gun, or at a minimum a hair dryer)
- Adhesive strips specific to your iPhone model
- Isopropyl alcohol and cleaning supplies
- A magnetic project mat or screw organization system
- An ESD wrist strap (some kits include this, many don’t)
- Replacement parts for your specific repair
Where to Buy
Amazon offers the widest selection and fastest shipping. iFixit’s own store (ifixit.com) is the best source for their branded tools and kits, often with bundle discounts. AliExpress has the lowest prices but shipping takes 2–4 weeks, and quality can be inconsistent, stick to sellers with high ratings and lots of reviews.
Essential Software Tools and Diagnostic Resources
Hardware tools are only half the equation. The software and knowledge resources you use are equally important for successful repairs.
Diagnostic Tools
Before you start any repair, it’s smart to run diagnostics so you know exactly what’s working and what isn’t. After the repair, run them again to verify everything is functioning properly.
- Apple Diagnostics: Built into iOS, this can identify hardware issues. Go to Settings > General > About and look for diagnostic options.
- 3uTools: A free desktop utility (Windows) that provides detailed hardware information, battery health reports, and verification of component authenticity.
- iMazing: Available for Mac and Windows, iMazing offers deep device inspection, backup capabilities, and diagnostic reporting.
- TestM / Phone Diagnostics: Mobile apps that test individual components like the screen, speakers, microphone, cameras, and sensors.
Repair Guides and Learning Resources
Never attempt a repair blind. Always pull up a step-by-step guide specific to your iPhone model and repair type before you begin. The best resources include:
- iFixit Repair Guides: Free, incredibly detailed, photo-heavy step-by-step walkthroughs for virtually every iPhone model and repair type. This should be your first stop.
- YouTube Channels: Hugh Jeffreys, JerryRigEverything, and the iFixit channel offer excellent video guides. Watching someone perform the exact repair you’re about to do is invaluable.
- Community Forums: The r/mobilerepair subreddit, GSM Forum, and various repair Discord servers are great places to ask questions and get advice from experienced technicians.
Post-Repair Considerations
After replacing certain components, your iPhone may display a “non-genuine part” warning in Settings. This is normal for third-party screens and batteries. It doesn’t affect functionality; it’s simply Apple’s way of noting the component wasn’t installed by an authorized technician. Some components (like True Tone displays and Face ID modules) may require calibration with specialized tools to restore full functionality after replacement.
Note: If you’re ever unsure, it’s smart to know how to find the right mobile phone repair shop as a backup plan. For the majority of common repairs, though? You’ve absolutely got this.
Wrapping Up: Build Your iPhone Repair Toolkit and Start Saving
There you have it, every essential tool you need for iPhone repair at home in 2026. From the critical precision screwdrivers and spudgers that get you into the device, to the heat tools that free stubborn adhesive, to the organizational systems that keep every tiny screw accounted for, building a comprehensive repair toolkit is one of the smartest investments a tech-savvy person can make.
Every repair you do yourself is money saved. Every tool you invest in pays for itself after just one or two fixes. And honestly, the confidence and satisfaction you gain from fixing your own device? That’s priceless.
Of course, some repairs are better left to the pros. If you ever run into a situation that’s beyond your comfort level, don’t hesitate to look for affordable cell phone repair near you. There’s no shame in knowing your limits, in fact, that’s a sign of a truly smart repairer.
Ready to get started? Bookmark this guide, check out our recommended iPhone screen repair kit, and start your repair journey today!