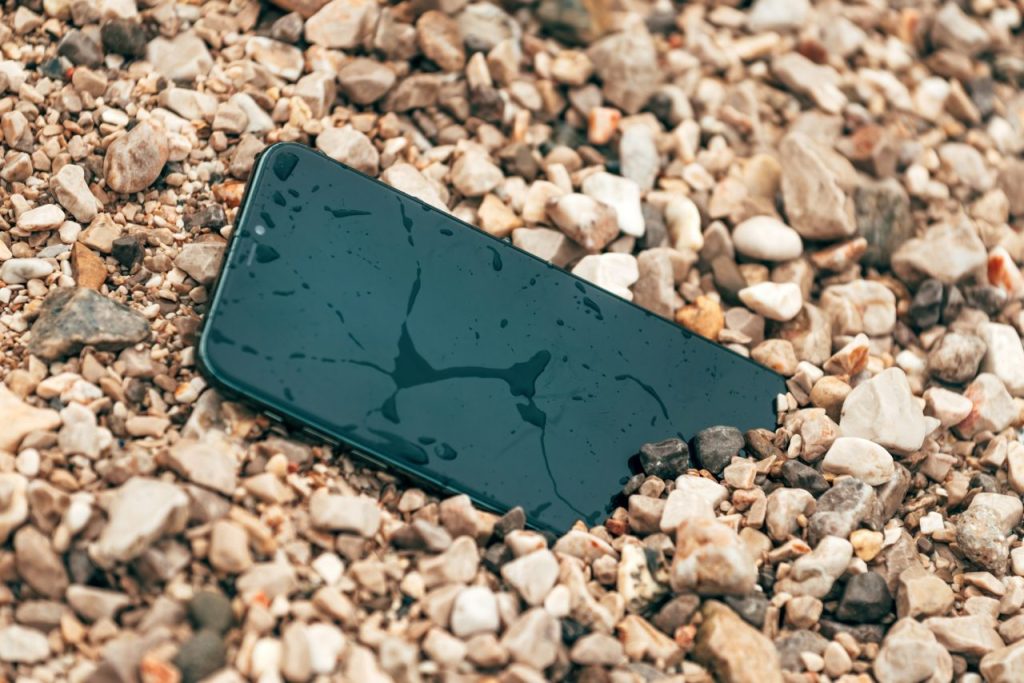
Picture this: your iPhone slips out of your hand and plunges straight into the sink, toilet, or pool. Your heart drops. We’ve all been there, or know someone who has. In fact, water damage is one of the top three reasons iPhones are brought in for repair, and millions of people face this panic-inducing moment every single year. That’s why this iPhone water damage repair guide matters; knowing the right steps immediately can mean saving your device instead of replacing it.
Here’s the good news: not all hope is lost! Whether your phone took a quick splash or a full-on submersion, there are proven steps you can take right now to maximize your chances of saving it. In this iPhone water damage repair guide, we’re covering everything, from the critical first 60 seconds after water exposure, to professional repair options, to what Apple’s warranty actually covers. Let’s dive in (pun intended).
What Happens When Your iPhone Gets Water Damaged?
To understand how to fix a water-damaged iPhone, you first need to know what’s happening inside the device. Water and electronics are a notoriously bad combination, and iPhones are no exception. When water enters your device, it doesn’t just sit there. It conducts electricity between components that should never be connected, causes short circuits, and triggers corrosion that can silently destroy internal hardware long after the water is gone.
One of the most dangerous misconceptions about modern iPhones is that “water resistant” means “waterproof.” It doesn’t! Apple’s IP67 and IP68 ratings (found on iPhone 8 and newer) mean the device can withstand immersion in water up to a certain depth for a limited time, under controlled, laboratory conditions. In the real world, things like wear and tear on the seals, exposure to saltwater or chlorinated water, and pressure from drops can all compromise that resistance significantly.
Here’s a quick breakdown of Apple’s IP ratings:
- IP67 (iPhone 8 through iPhone 11): Water resistant up to 1 meter for 30 minutes
- IP68 (iPhone 12 and newer): Water resistant up to 6 meters for 30 minutes
- No IP rating (iPhone 6 and older): No official water resistance whatsoever
Another important thing to know: water damage symptoms aren’t always immediate. Corrosion can develop over hours or even days, meaning your phone might seem fine at first, only to fail later. This delayed damage is especially common with saltwater, which is far more corrosive than fresh water. The bottom line? Even if your iPhone seems okay after a dip, take the steps below seriously.
The First 60 Seconds — What To Do Immediately After Water Exposure
The actions you take in the first minute after your iPhone gets wet can be the difference between a full recovery and a total loss. Don’t panic — follow these steps quickly and calmly.
Step 1: Power It Off Immediately
This is the single most important thing you can do. If your iPhone is still on, power it off right away. Electricity and water create short circuits, which cause permanent damage. Press and hold the side button and volume button (on Face ID models) or just the side button (on Touch ID models) to power down. Do not wait.
Step 2: Remove Everything You Can
Take off your case, remove the SIM card tray (use your SIM ejector tool or a paperclip), and unplug any cables or accessories. The more airflow you can create around and inside the device, the better.
Step 3: Do NOT Use Heat or Rice
We know, we know, you’ve heard the rice trick your whole life. But here’s the truth: putting your iPhone in rice is largely ineffective and can actually make things worse. Rice dust and starch particles can enter the charging port and other openings, causing additional issues.
Hair dryers, ovens, and microwaves are even more dangerous; heat can warp internal components, damage the battery, and destroy the adhesive seals that help keep the phone water resistant in the first place.
Step 4: Gently Pat Dry
Using a soft, lint-free cloth (a microfiber cloth works great), gently pat, don’t rub, the exterior of the phone dry. Pay special attention to the charging port, headphone jack, and speaker grilles. You can lightly blow into the ports to displace surface water, but avoid compressed air at high pressure, which can push water deeper inside.
Step 5: Position It Correctly
Place your iPhone with the Lightning or USB-C port facing downward. This allows gravity to help drain any water that may have entered. Leave it in a cool, dry, well-ventilated area and resist the urge to turn it back on.
Step-by-Step iPhone Water Damage Repair Guide (DIY Methods)
Once you’ve done the immediate triage, it’s time to focus on drying your iPhone properly. This is where patience really pays off. The goal is to remove every trace of moisture before you attempt to power the device back on.
The Silica Gel Method (Best DIY Option)
Silica gel packets — those little white packets you find in shoe boxes and electronics packaging — are excellent moisture absorbers. Place your iPhone in a zip-lock bag or airtight container along with a generous handful of silica gel packets. Seal it up and leave it for at least 48–72 hours. This method is far superior to rice and is inexpensive if you stock up on silica gel packets in advance (a great idea for the future!).
The 48–72 Hour Rule
No matter which drying method you use, patience is essential. We strongly recommend waiting a full 48 to 72 hours before attempting to power your iPhone back on. It feels like forever, we know. But turning it on too soon is one of the most common mistakes people make, and it can cause permanent damage that might have been avoided with just a little more patience.
DIY Repair Kits: Worth It?
If drying doesn’t fully resolve the issue, you may be wondering whether to attempt a more hands-on DIY repair. Before you crack open your device, we strongly recommend reading our in-depth guide on DIY vs. professional iPhone repair. It’ll help you make an informed decision about whether the DIY route is right for your specific situation, or whether you’re better off handing it over to a pro.
How to Test If Your iPhone Is Ready
- Check the charging port for any visible moisture or condensation
- Look for moisture under the camera lens or screen
- Check for any fogging inside the display
- If all is clear, plug in a charger briefly and watch for the “Liquid Detected” alert on the screen, a built-in indicator that moisture is still present
If you see the “Liquid Detected” warning, put it back in the desiccant container for another 24 hours. Don’t ignore that warning, Apple built it in for a reason!
Signs Your iPhone Has Water Damage (And How Severe It Is)
Not sure if your iPhone has water damage? There are several telltale signs — some obvious, some subtle. Knowing how to identify and assess the severity of water damage can help you decide on the best course of action.
Check the Liquid Contact Indicator (LCI)
Apple includes a Liquid Contact Indicator inside every iPhone. On most models, it’s located in the SIM card tray slot. To check it, eject your SIM tray and shine a flashlight into the slot. The LCI is normally white or silver. If it has turned red or pink, water has entered the device. This is also the indicator Apple technicians will check when you bring your phone in for service.
Common Symptoms of iPhone Water Damage
- Ghost touch or unresponsive touchscreen — often one of the first signs of water damage to the display assembly
- Distorted, muffled, or crackling speaker sound
- Blurry or foggy camera (moisture under the lens can cause permanent fogging if not addressed quickly)
- Charging issues or the phone not charging at all — the charging port is especially vulnerable to water intrusion
- Microphone not working during calls
- Random restarts or the phone not turning on
- Lines or discoloration on the display
- Buttons feeling sticky or unresponsive
- Battery draining unusually fast after water exposure — a sign that the battery or power management circuitry has been compromised
Corrosion is the long-term enemy of water-damaged iPhones. Even after the water is gone, mineral deposits left behind can corrode the logic board, battery contacts, and connectors over days or weeks. This is why acting fast and drying thoroughly are so critical — and why saltwater damage is particularly severe. Salt accelerates corrosion dramatically compared to fresh water.
Professional iPhone Water Damage Repair Options
If your DIY drying efforts didn’t fully resolve the issue, or if the damage is severe, it’s time to bring in the professionals. Here’s a breakdown of your options:
Apple Store / Apple Authorized Service Provider
Apple Stores and Apple Authorized Service Providers are the gold standard for iPhone repairs. Technicians have access to genuine parts, diagnostic tools, and Apple’s proprietary repair processes. However, be aware that Apple’s standard warranty does not cover water damage. If you don’t have AppleCare+, out-of-warranty repair can be expensive — often ranging from $299 to $599 or more, depending on your model. In some cases, Apple may offer a flat-rate repair or recommend a device replacement.
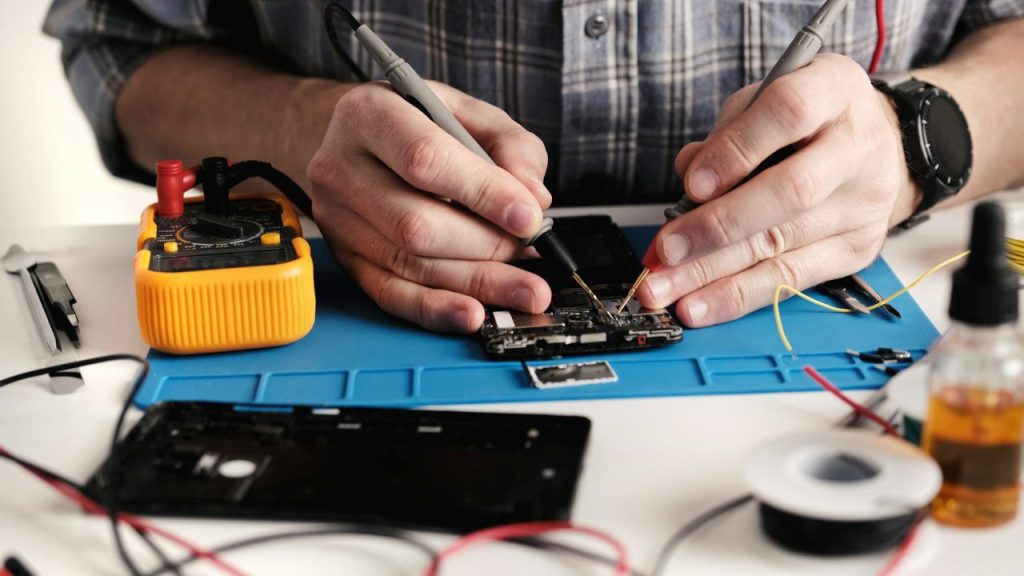
Third-Party Repair Shops
Reputable third-party repair shops can often fix water damage for significantly less than Apple. Many specialize in logic board-level repair, which involves cleaning and re-soldering corroded components — a service Apple doesn’t typically offer. When choosing a third-party shop, look for certified technicians, positive reviews, a warranty on repairs, and transparent pricing. Ask specifically whether they offer ultrasonic cleaning, which is considered the gold standard for water damage treatment.
Ultrasonic Cleaning: The Professional’s Secret Weapon
Ultrasonic cleaning uses high-frequency sound waves in a specialized cleaning solution to remove corrosion, mineral deposits, and debris from circuit boards, all without damaging delicate components. It’s one of the most effective treatments for water-damaged logic boards and is increasingly offered by professional repair shops. If your iPhone experienced significant submersion, this is worth asking about specifically.
Mail-In Repair Services
Don’t have a good local repair shop? Mail-in repair services are a convenient alternative. You ship your device to a specialist, they diagnose and repair it, and ship it back. Turnaround times typically range from 3 to 7 business days. Always choose a service with a clear warranty policy and secure shipping options.
Does Apple Warranty or AppleCare+ Cover Water Damage?
This is one of the most commonly asked questions after a water damage incident, and the answer is nuanced — so let’s break it down clearly.
Standard Apple Warranty: Water Damage is NOT Covered
Apple’s standard one-year limited warranty covers manufacturing defects — not accidental damage, including water damage. Even if your iPhone has an IP68 rating, Apple will not cover water damage under the standard warranty. The Liquid Contact Indicator is how technicians confirm water entry, and a tripped LCI can void your warranty for related damage.
AppleCare+: Accidental Damage Coverage
AppleCare+ is a different story. As of 2026, AppleCare+ includes coverage for accidental damage, including water damage, subject to a service fee. The accidental damage fee for screen damage is typically $29, while “other accidental damage” (including water damage) carries a $99 service fee per incident. You get up to two incidents of accidental damage coverage per 12-month period. If you have AppleCare+, this is almost always the most cost-effective repair option!
Other Insurance Options
- Carrier device protection plans (e.g., Verizon, AT&T, T-Mobile): Most cover accidental damage including water damage, for a monthly fee
- Renters or homeowners insurance: Many policies cover electronics, including smartphones, under personal property coverage
- Credit card benefits: Some premium credit cards offer purchase protection or extended warranty coverage that may apply
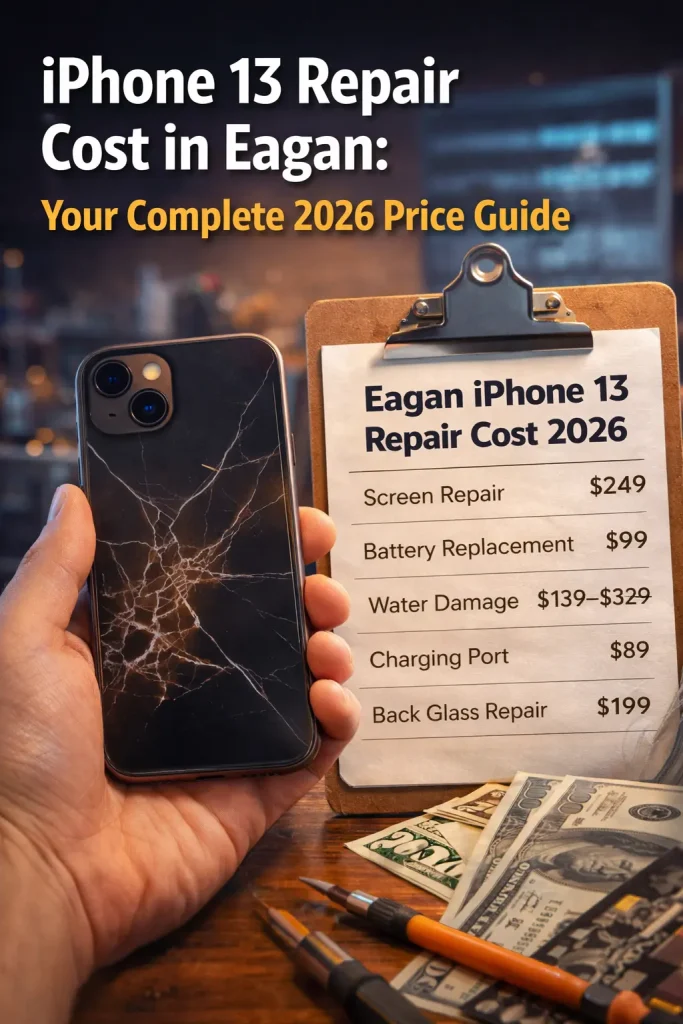
iPhone Water Damage Repair Cost Breakdown (2026)
One of the first things people want to know is: how much is this going to cost me? The honest answer is “it depends,” but here’s a realistic breakdown of what you can expect to pay in 2026:
Apple Out-of-Warranty Repair (Water Damage)
- iPhone 13 series: $299–$399
- iPhone 14 series: $349–$449
- iPhone 15 series: $399–$499
- iPhone 16 series: $449–$549
- iPhone 17 series: $499–$599+
Third-Party Repair Shops (Logic Board Cleaning/Repair)
- Basic diagnostic and cleaning: $50–$150
- Ultrasonic cleaning service: $80–$200
- Logic board component repair: $150–$400+
- Data recovery only: $100–$500, depending on severity
If your screen was also damaged in the incident, you’ll want to factor in that cost separately. Our iPhone screen repair guide includes current pricing by model.
The big question everyone has to answer: Is it worth repairing, or should I just buy a new iPhone? As a general rule of thumb, if the repair cost exceeds 50–60% of the device’s current market value, replacement is often the smarter financial decision. Don’t forget to factor in the value of your data; if there are irreplaceable photos or files on that device, data recovery becomes a priority regardless of cost.
How to Prevent iPhone Water Damage in the Future
The best iPhone water damage repair is the one you never have to make! Once you’ve survived a water damage scare, or even if you haven’t, it’s worth investing in some proactive protection.
Invest in a Quality Waterproof Case
A good waterproof iPhone case is your best defense. Brands like Lifeproof, Catalyst, and Ghostek make excellent options that offer genuine waterproof protection (not just water resistance) at various price points. For everyday use, even a highly water-resistant case provides a significant boost in protection over no case at all.
Develop Smart Water-Safe Habits
- Keep your iPhone away from sink edges, bathtub ledges, and pool decks where it can easily fall
- Use a waterproof pouch when swimming, kayaking, or at the beach
- Avoid using your iPhone in the rain whenever possible
- Don’t bring your phone into the bathroom during steamy showers
- Be especially careful around saltwater — even a water-resistant iPhone can be damaged by ocean spray
And always, always, keep your iPhone backed up! Whether you use iCloud, a Mac, or a PC, regular backups mean that even if your device is destroyed, your data survives. It’s the one “repair” you can make before anything bad happens.
Note: If the battery has been compromised, you may also be able to use your coverage for a iPhone battery replacement at the same time, a smart move if your phone is showing signs of battery drain after water exposure.
Final Thoughts: Don’t Panic — But Don’t Wait Either
Dealing with a water-damaged iPhone is stressful, but it doesn’t have to mean the end of your device. By acting fast, avoiding common mistakes (we’re looking at you, rice bag!), and knowing when to call in the professionals, you give your iPhone the best possible chance of survival.
Whether you choose the DIY route or head straight to a repair shop like Helpertech, the most important thing is not to wait. Every hour that passes with moisture inside your device increases the risk of permanent corrosion and damage. So take action now, your contacts, photos, and apps are counting on you!
Have questions about your specific situation? Reach out to Helpertech; we have a certified repair technician in your area for a professional assessment. And if this guide helped you rescue your iPhone, share it with a friend; you might just save someone else’s device too!